Roll-up banner stands are portable, retractable displays perfect for marketing events. They offer high-impact visuals and are easy to set up and transport.
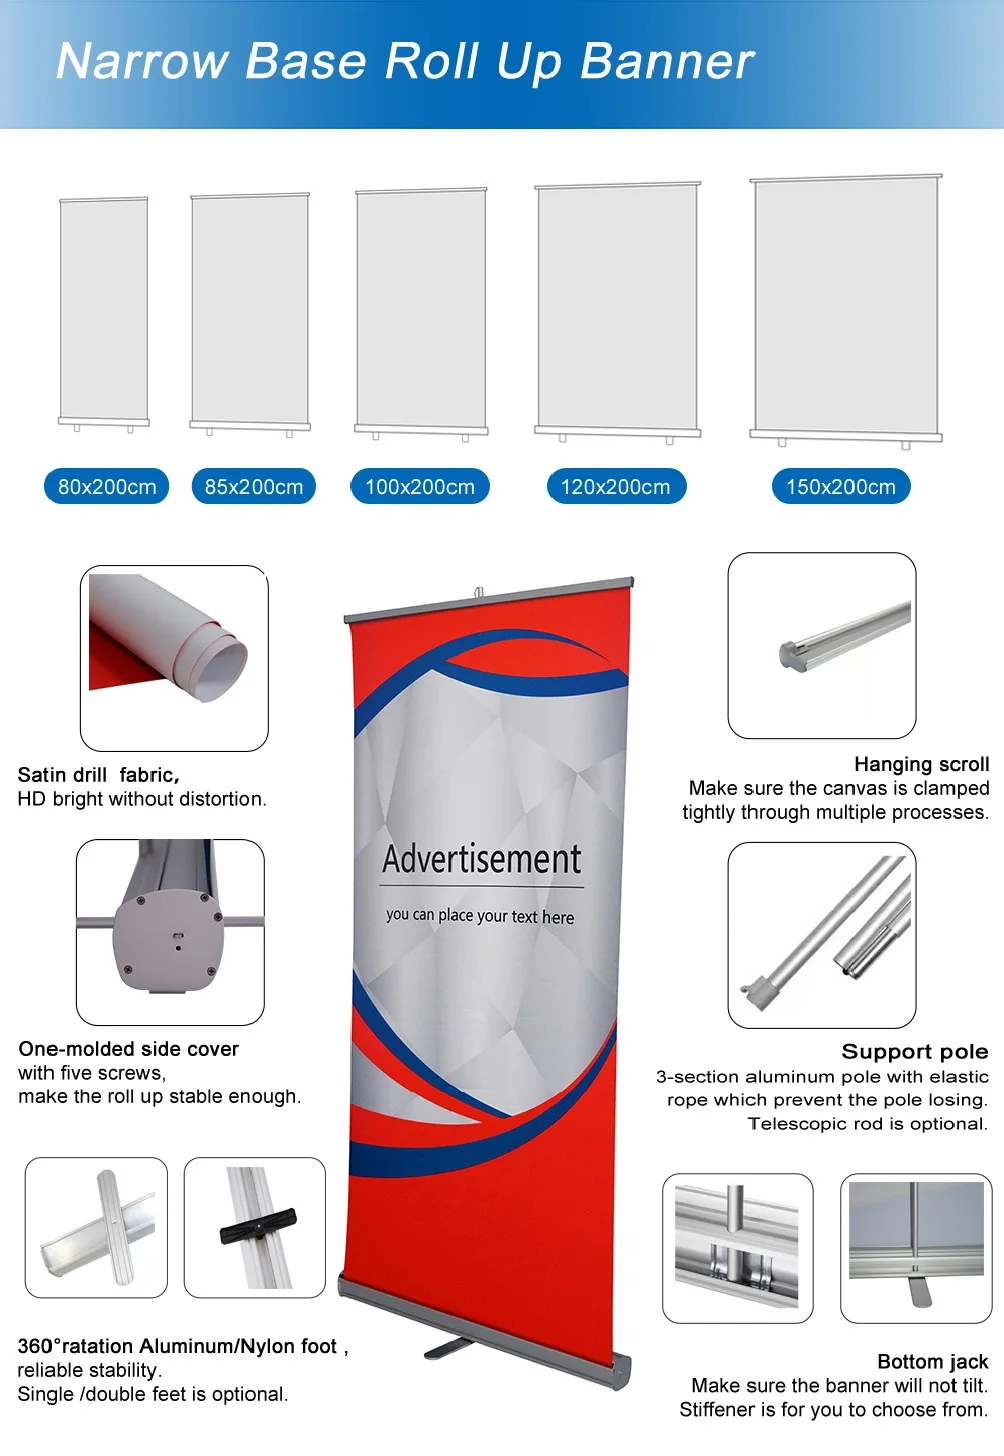
Table of Contents
- What Exactly is a Roll-Up Banner Stand?
- Why are Retractable Banners Essential for Modern Marketing Events?
- How to Select the Perfect Roll-Up Banner for Your Needs
- Designing a Roll-Up Banner That Captivates and Converts
- Practical Application: From Setup to Storage
- Avoiding Common Pitfalls with Retractable Banners
What Exactly is a Roll-Up Banner Stand?
A roll-up banner stand is a self-contained, free-standing display unit that features a printed graphic. Its defining characteristic is the mechanism within its base that allows the graphic to be retracted for storage and pulled up for presentation. This design makes it one of the most popular and practical tools for event marketing, trade shows, and in-store promotions.
The system consists of four main components. The base, also known as a cassette, houses the retractable spring mechanism and provides stability. A collapsible support pole, typically made of aluminum, extends to hold the graphic at its full height. The top rail clamps onto the upper edge of the graphic, allowing it to be securely hooked onto the support pole. Finally, the printed graphic itself carries your marketing message. Unlike static X-banner or L-banner stands, the roll-up banner’s integrated design protects the graphic during transit and simplifies setup significantly.
Why are Retractable Banners Essential for Modern Marketing Events?
In the fast-paced environment of a marketing event or trade show, every second and every inch of space counts. Retractable banners have become an indispensable asset for marketers due to their unique combination of visibility, convenience, and value.
Their primary advantage is unmatched portability and convenience. Most roll-up banner stands are lightweight and come with a dedicated padded carrying case. A single person can easily transport several units and set them up in minutes without any tools. This swift assembly and disassembly process frees up valuable time for your team to focus on engaging with attendees rather than struggling with complicated booth construction.
These banners facilitate high-impact visual communication in crowded venues. Their tall, vertical format naturally draws the eye and allows you to place key branding and messages at eye level, where they are most effective. A bold, well-designed graphic can cut through the visual noise of an event floor, capturing attention from a distance and guiding potential clients to your location.
From a budget perspective, roll-up banners are incredibly cost-effective and reusable. The initial investment is modest compared to many other forms of event advertising. Moreover, the hardware is built for repeated use. For new campaigns or events, you can simply have a new graphic printed and installed into the existing base, dramatically increasing the long-term return on your investment. This reusability makes them a sustainable choice for any marketing calendar. A quality stand from a trusted manufacturer like Rieca Display ensures the hardware is durable enough to last through numerous events and graphic changes, making it a wise investment.
How to Select the Perfect Roll-Up Banner for Your Needs
Choosing the right retractable banner involves more than just the graphic design; the hardware itself plays a critical role in its effectiveness and longevity. The ideal stand depends on your specific application, budget, and frequency of use. Considering these factors upfront will ensure you select a product that not only looks professional but also withstands the rigors of your marketing activities.
Sizing and Dimensions: What Are Your Options?
Roll-up banners come in a variety of sizes to suit different spaces and purposes. The most common standard size is approximately 85cm wide by 200cm tall (around 33" x 79"), offering a significant visual presence without an overwhelming footprint. However, options exist for wider formats—such as 100cm, 120cm, or even 150cm—for creating larger backdrops or making a bigger statement.
For smaller applications, such as countertop displays at a registration desk or point-of-sale promotions, desktop roll-up banners in A4 or A3 sizes are an excellent choice. When selecting a size, consider the viewing distance and the context of the venue. A larger banner is necessary for a big exhibition hall, while a standard or smaller size may be more appropriate for an intimate conference room or retail space.
| Banner Size | Typical Use Case | Key Advantage |
|---|---|---|
| Desktop (A4/A3) | Reception desks, point-of-sale, restaurant tables | Compact and informative for close-up viewing. |
| Standard (85cm x 200cm) | Trade show booths, conference entrances, retail stores | Versatile and highly portable; the industry standard. |
| Wide (100cm - 150cm) | Step-and-repeat backdrops, stage presentations, large exhibition spaces | Creates a significant visual wall for maximum impact. |
Stand Mechanism and Base Quality: Standard vs. Premium
The base of the roll-up stand is its foundation, and its quality dictates the banner's stability and lifespan. Standard or economy models are often lightweight with simple stabilizing feet (such as two swing-out feet or a single folding foot). These are a great, budget-friendly option for infrequent use or for one-off events.
Premium stands, in contrast, feature a heavier, more robust base, often with a wider footprint and no protruding feet for a sleeker look. The internal retraction mechanisms are engineered for greater durability, making them the ideal choice for businesses that attend many events throughout the year. A premium stand is less likely to lean, wobble, or fail, presenting a more professional and reliable image for your brand. When sourcing your displays, partnering with a manufacturer like Rieca Display gives you access to a spectrum of options, from economical models to heavy-duty premium bases, ensuring a perfect match for your budget and performance needs.
Single-Sided or Double-Sided Displays?
Your banner's placement will determine whether a single-sided or double-sided unit is more appropriate. A single-sided banner is the most common type and is perfect for placement against a wall, at the back of a booth, or in a corner. All visual focus is on one direction.
A double-sided roll-up banner features two graphics that retract into the same base, displaying your message in opposite directions. This type is extremely effective in open areas with 360-degree foot traffic, such as hallways, large lobbies, or in the middle of a large exhibition space. It doubles your visibility and can capture the attention of audiences coming from multiple directions, maximizing your promotional reach.
Designing a Roll-Up Banner That Captivates and Converts
A high-quality stand is only half the equation; the graphic design is what will ultimately engage your audience and drive results. An effective banner design is a blend of artistic branding and clear, strategic communication. It must be visually arresting enough to grab attention and simple enough to be understood in a matter of seconds.
Key Principles of Effective Banner Design
To create a successful banner, follow a clear top-down information hierarchy. Place your company logo and most important message at the top of the banner, at eye level. This is the first thing people will see. Supporting details should follow below, with contact information or a call to action placed towards the bottom.
Use striking visuals. High-resolution images, bold brand colors, and clean graphics are essential. A powerful product shot or lifestyle image can convey more than a paragraph of text. Ensure all visual elements are crisp and professional. Avoid clutter; negative space is crucial for making your key elements stand out.
Keep your text concise and readable. Use a large, bold font for your main headline. Bullet points are more effective than long paragraphs. The goal is for someone walking by to grasp your core message instantly. Finally, every banner should have a clear call to action (CTA). Tell the viewer what you want them to do next. This could be "Visit Booth 123," "Scan for a Free Demo," or "Visit our Website." A strong CTA transforms a passive viewer into an active lead.
Technical Specifications for Flawless Printing
To ensure your design translates perfectly from screen to print, you must adhere to technical file requirements. Most printers prefer files in a vector-based PDF format, though high-resolution AI, PSD, or TIFF files may also be acceptable. For a large-format item like a banner, setting your image resolution to 150 DPI (dots per inch) at the final print size is a safe standard that ensures sharpness without creating an unmanageably large file.
Always design your banner in the CMYK color mode, not RGB. CMYK (Cyan, Magenta, Yellow, Key/Black) is the color space used for professional printing, and designing in this mode prevents unexpected color shifts. Most importantly, pay attention to the bleed and safe zones. The bleed is an extra margin of your design that extends beyond the final trim edge, ensuring no white lines appear if the cut is slightly off. The safe zone is the inner area where all critical text and logos should be kept to avoid being obscured by the stand's hardware. Reputable suppliers and manufacturers like Rieca Display provide precise design templates that outline these zones, taking the guesswork out of file preparation.
Practical Application: From Setup to Storage
Owning a roll-up banner is one thing; using it effectively and ensuring it lasts is another. Proper handling, strategic placement, and correct storage are key to maximizing your investment and maintaining a professional appearance at every event.
Step-by-Step Assembly and Takedown
The beauty of a retractable banner is its simplicity. Assembling it takes only a minute or two:
- Remove the base, pole, and top rail from the carrying case.
- Assemble the multi-sectioned support pole by inserting the pieces into one another.
- Insert the bottom end of the assembled pole firmly into the designated hole in the base.
- Stand on the base's stabilizing feet (if applicable), grip the top rail, and pull the graphic upward smoothly.
- Once fully extended, hook the top rail onto the top of the support pole. Adjust to ensure it is straight.
Takedown is just as simple. Unhook the top rail, and guide the graphic as it retracts back into the base. Do not let it snap back freely, as this can damage the print or the mechanism. Once retracted, disassemble the pole and pack all components neatly into the carrying case.
Strategic Placement at Your Event
Where you place your banner can dramatically affect its visibility. Position it in high-traffic areas where it is likely to be seen by the most people. Ideal locations include the entrance to your booth, near registration or information desks, flanking a presentation stage, or at the end of an aisle to draw attendees in. Using two banners to frame your booth's entrance can create a powerful and welcoming gateway for visitors.
Care and Maintenance for Long-Term Use
To keep your banner looking its best, proper care is essential. The printed graphic can be gently wiped with a soft, damp cloth to remove dust or smudges. Avoid harsh chemicals or abrasive materials. The base mechanism requires little maintenance, but its longevity depends on careful use. Always retract the graphic slowly and smoothly.
When not in use, store the banner in its carrying case in a cool, dry place. This protects it from moisture, sunlight, and physical damage. Investing in a stand with high-quality components is the best way to ensure longevity. The durable retraction mechanisms and sturdy aluminum construction found in Rieca Display's products are designed for repeated deployment, ensuring your investment remains a reliable marketing tool for years to come.
Avoiding Common Pitfalls with Retractable Banners
A poorly executed roll-up banner can do more harm than good. To ensure your display enhances your brand image, be mindful of several common mistakes. The most frequent error is an overcrowded design. Trying to fit too much text, too many images, and multiple messages onto one banner results in a confusing and illegible mess. Prioritize one core message and support it with clean visuals and minimal text.
Another major issue is using low-quality imagery. A pixelated logo or a blurry product photo looks unprofessional and cheapens your brand. Always use high-resolution source files for all images and graphics to ensure a sharp, crisp final print. This reflects a commitment to quality in all aspects of your business.
On the technical side, forgetting the bleed and safe zones is a costly mistake. If critical information is placed too close to the edge or at the very bottom, it risks being trimmed off during production or hidden by the base mechanism. Always use the template provided by your printer to position your content correctly.
Finally, a significant pitfall is choosing the wrong stand quality for your needs. Opting for the cheapest possible stand for a multi-city roadshow is a recipe for disaster. A flimsy banner that leans, sags, or breaks mid-event reflects poorly on your brand's reliability and attention to detail. Investing in a sturdy, well-built stand is an investment in your professional image.